|
StopICE.net alarms trigger audible alerts when ICE is nearby.
|
Order
|
Donate
Stopice Alarm's are fully assembled. Help us continue to build and distribute alarms to communities for free by
donating!
You can also order an alarm for a
suggested donation.
Each alarm is equipped with a buzzer for indoor alerts and a siren for outdoor alerts.
The alarm is automatically activated whenever a stopice.net alert is sent to your area.
These alarms can be quickly setup from any phone or computer, and paired securely
with any wifi network.
Each alarm is equippped with an internal wifi hotspot to access and adjust settings such as zipcode, range, sound
and other device parameters.
|
Step 1 - Plugin your alarm.
|
The alarm plugs into any USB charger for power. Once your alarm is plugged in
wait 30 seconds or so for it to boot up successfully. You'll know bootup is successful when your alarm beeps 3 times.
Your alarm will broadcast it's own wireless hostpost called "sialarm". Look for this on your phone or computer
under available wifi networks and hit connect.
The default password for your hotspot is 1234567890
|
Step 3 - Update device settings.
|
Once you've connected to your alarm hotspot, open your browser and navigate to http://www.stopice.local
You will be prompted to enter a username and password to access your device settings. Your default login is:
username: admin
password: 123456
Next you will be prompted to set a new device password. Enter a unique password, but don't forget it.
Otherwise you'll be locked out and won't be able to adjust your device settings.
Then you will be prompted to set a new hotspot password. This password is for the internal hotspot broadcasted by
your alarm which is used a secondary authentication layer to access your settings.
Hit 'next' , your alarm will save your new settings and you will be prompted to login with your new device password.
From here, the setup wizard will guide you through the remainder of the setup process which only takes a couple minutes.
|
Step 4 - Pair your device to a secure wifi network
|
Once you've logged in you'll see available wifi networks in range. Choose your internet wifi network, enter
your wifi password and hit connect.
Once your device has successfully connected, a green icon will appear indicating your device is now online.
Next you will be prompted to update your alarm settings where you can update your zipcode, distance preferences,
alarm type, etc. You can also access this section in the top right drop-down menu under 'alarm settings'
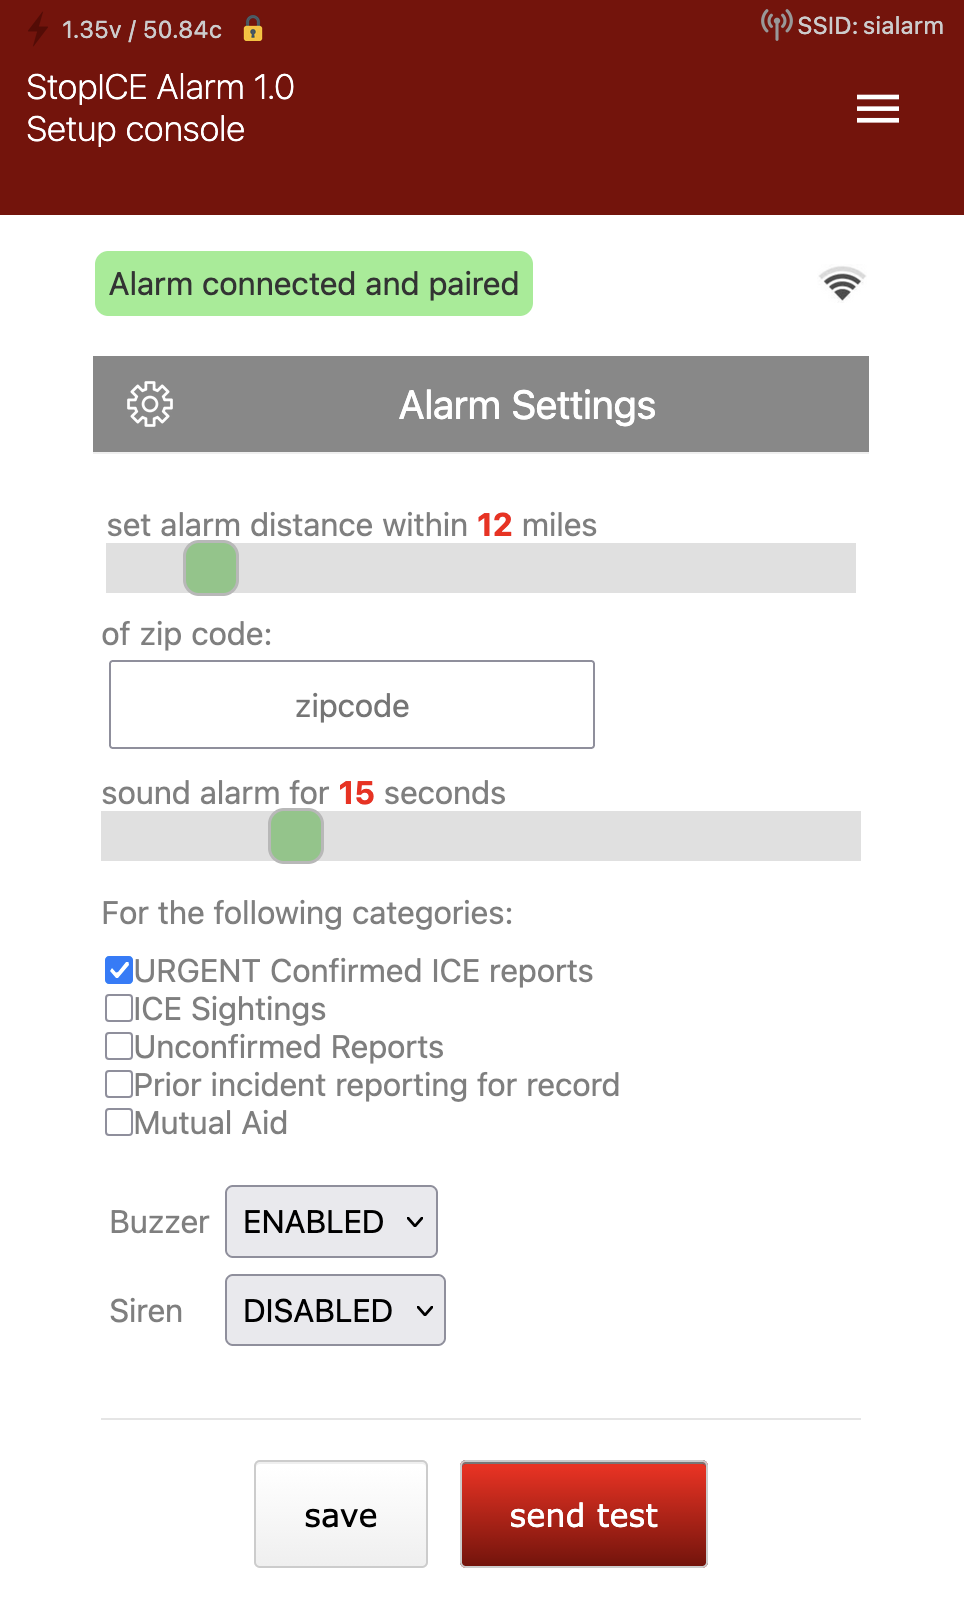
Enter your zipcode and choose the maximum distance (in miles) for your alarm to cover.
Depending on your use-case, it's best to set your distance to 1-2 miles if you only want your alarm activated
for nearby activity. If you want your alarm activated over a larger area adjust your settings to cover more distance.
NOTE Stopice alarms do not use GPS tracking and are not equipped with a GPS chip. Your distance preferences are determined by
polar coordinate calculations between your zip code and the zip codes of reported alerts on the network.
Choose the alert categories that will activate your alarm, and enable or disable your siren. By default your alarm
operates with a buzzer alarm which is suitable for indoor alerts.
You can also enable the siren option which is much louder and works best if your alarm is
pointed outside or mounted outdoors.
Click 'save'. Navigate back to your alarm settings and click 'test' to make sure your alarm is properly connected
and authenticated with the stopice API server. Your alarm will shortly activate a test signal based on your settings.
The small red LED on the side of your alarm should be illuminated as solid red.
This means your alarm is connected and activated.
If your setup console says your alarm is disconnected, wait 30 seconds or try hitting refresh. Try navigating again to http://www.stopice.local.
If the issue persists, the wifi network you've chosen may not have internet access or you may need to move the alarm closer
to your wifi router.
- The red LED on the left side is flashing quickly before turning off. What does it mean?
If your alarm cannot connect to the stopice API server, or drops a connection, the red LED will
flash in quick intervals before turning off, and then repeat until a connection is re-established.
- The red LED on the left side is flashing in slow pulses. What does it mean?
If your alarm is connected but cannot authenticate with the stopice API server, the red LED on the side
will blink at slow pulsing intervals until the issue is corrected. If this occurs, please
contact us.
|
Stopice.net alarms are 100% open-source.
|
|

|
Tech-saavy? Dive in, inspect and modify the alarm any way you wish.
Stopice alarms are developed using a small single-board computer (SBC) designed
to make coding, electronics, and computing accessible to anyone.
If you're familiar with linux commands, you can access the source-code directly
linux shell environment. The source-code is commented and simplified for direction and
transparency to encourage modifications.
Be sure to disable automatic updates under 'device settings'
otherwise any changes you make to the code might be overwritten!
Stopice alarms integrate directly with the Stopice JSON API.
Be mindful of rate-limiting during modification testing.
|
|
|
StopICE alarms are designed with multiple layers of security and should not be modified to function outside of their intended purpose.
Each device operates similar to a wireless access point.
This access point operates it's own internal network enabling you to access alarm settings given you connect to it's wifi network with two sets of credentials.
Once plugged in, your alarm will broadcast a wireless network SSID "sialarm" - this is a default SSID and can be changed during setup.
You must provide the default password to connect to the wireless network, then you must browse to www.stopice.local and provide a second default password to access the alarm settings interface.
This is not a web url, this is an internal network URL that can only be accessed when connected to the alarm's internal wireless network.
After logging in with the second default setup password, you are required to choose two unique passwords for both sets of credentials before proceeding with the activation steps.
You will then be prompted to login again with the new credentials you've just supplied.
Upon successful login, you will then be prompted to pair the alarm with a secured wifi network.
It is recommended that you avoid public or open wifi networks. Only connect to a secured and trusted wifi network.
Once your device is connected, it will establish a connection with the StopICE API server
and prompt you to update your alarm settings where you can set your desired zip code and range for alerts.
StopICE alarms do not utilize GPS tracking and they do not contain a GPS chip.
Your alarm is triggered based on the proximity of alerts to the zip code you provide under alarm settings.
Alerts are received through the StopICE API based on polar coordinate distances between corresponding zip codes using an internal server-side database.
Once you've updated your settings, your alarm completes a pairing process with the StopICE API and encrypts your API key data on the server.
Your encryption key is not stored on the server and it can only be unlocked from your alarm device.
Although this data does not contain any personal or sensitive information, we've integrated end-to-end encryption as a standard security practice.
Once you're alarm is connected and paired, you can change your SSID under "device settings." You can also deactivate your SSID broadcast (recommended)
This means your alarm's wifi network will no longer be visible to other devices in range.
Your alarm can also operate as a secondary access point to your wifi network.
This is helpful when connecting to your alarm's internal network to adjust settings, but you can also disable this by turning off SSID broadcast under "device settings", and by removing traffic forwarding.
Stopice alarms are developed using a small single-board computer (SBC) which runs on DietPi linux, an extremely lightweight Debian OS.
If you are familiar with linux shell commands, you can access your device terminal shell using the second set of login credentials you provided to access the alarm interface.
If you are familiar with coding, you can prevent your alarm from using these login credentials and instead setup a different shell login for added security.
Never share your passwords. Never change the API server settings to a server that has not been verified by stopice.net.
|
|
release:
|
HW version 1.0
Software version 1.0b
|
StopICE Alarm version 1.0b is built on DietPi linux which is an extremely lightweight Debian OS.
Full codebase, parts list and wiring diagram is being posted to the developer section shortly.
You can also request a tarball by contacting us
Additional questions? contact.
Disclaimer
These devices are distributed in the interest of public safety, legal transparency and public reporting.
These devices are developed as open-source projects, and not intended to encourage nor participate in
illegal activity of any kind.
Installing alarms is legal and you have a right to monitor your own property
provided you respect local privacy and noise ordinances. If you have any specific questions related to
your cities local ordinances check with your local municipal codes.
|

 Stop ICE Alerts
 UNCONFIRMED reports are intended to gather more information before being labeled CONFIRMED- which is why these comments exist as a crowd sourcing tool for
additional feedback.
UNCONFIRMED reports are intended to gather more information before being labeled CONFIRMED- which is why these comments exist as a crowd sourcing tool for
additional feedback.